
For as long as I can remember, chocolate-covered marshmallow eggs have always been included in our Easter baskets. In recent years, however, I’ve begun more and more to notice a bit of an off-taste in a lot of store-bought things, and marshmallow eggs were one of them. Still, even though I have a recipe for marshmallows in a cookbook, I just never considered making any myself.
One year, about 6 years ago, I decided to make some candy for Easter. No, it wasn’t marshmallow eggs, actually. It was marshmallow fudge, which called for marshmallow creme. The next year I wanted to make the fudge again, but we weren’t able to find marshmallow creme at the store. So I searched online and found this marshmallow fluff recipe which was just the thing I needed for my fudge. It worked like a charm, and I was so proud of myself for having made it and eliminating another store-bought item with questionable ingredients. (In my post about my white blouse there is a picture where I am making that marshmallow fluff.)
At that time my candy-making experience was limited to shortcut marshmallow fudge and caramel, so I was understandably excited about this achievement. After my experience making marshmallow creme, I suddenly got to thinking. What if I could make marshmallow eggs? I searched online and found the perfect recipe, and next Easter I made them.
The Best Marshmallow Eggs

Before I get to the recipe, let me just take a moment to talk about these marshmallow eggs a bit. They are wonderful. I went from casually liking marshmallow eggs to being obsessed with these. Seriously, this has to be one of the best candies I’ve ever tasted. After making it for the first time, I’ve made it for Easter every year since then. Sometimes I make a second batch after the first one is gone. I now consider these marshmallow eggs to be one of the most important things to make it into Easter baskets, and would never dream of omitting them.
I love them. My family loves them. My boyfriend loves them. Everybody who has tried them has loved them. I’ve even made these in the middle of the year as an everyday treat. When I offered to make something as a gift one time for a neighbor’s daughters, they requested these.
These are 100 times better than anything from the store. The texture is firm yet soft and fluffy, without the slightly rubbery feel of the store-bought ones. The flavor is everything a marshmallow should be, without the off-taste that store-bought ones have. I’m not even sure these can be compared. They are in a class all their own. If you ever bought marshmallow eggs, once you make these, I almost guarantee you will never buy them again. And they are really easy to make.
The recipe I’m sharing is an adaptation of this one from Mel’s Kitchen Cafe. The original recipe calls for corn syrup, but since I don’t use corn syrup, I substituted a boiled sugar syrup. This is an extra step for making these, but for those who don’t have corn syrup or don’t want to use it, it works very well as a substitute, in my experience.
Ingredients
Sugar Syrup
- 2 cups sugar
- 1 cup water
- 1/2 teaspoon cream of tartar or
- 1/4 teaspoon lemon juice (I always use cream of tartar)
Marshmallows
- 1/2 cup cold water
- 2 tablespoons unflavored gelatin (3 packets)
- 1 1/2 cups granulated sugar
- 1 cup sugar syrup
- 1/2 cup water
- 1/4 teaspoon salt
- 2 pounds of chocolate for dipping
- All-purpose flour or powdered sugar for molding
Instructions
Sugar Syrup
- Combine the sugar, water, and cream of tartar or lemon juice in a small saucepan. Cook over medium-low heat, stirring until the sugar dissolves. When the sugar is all dissolved, clip a candy thermometer to the side of the pan. Continue cooking over medium heat, letting the mixture boil gently, until the thermometer registers 230°F. This should take about 20 minutes. Remove from heat and allow to cool for at least 30 minutes. The syrup will become thicker and stickier as it cools. This recipe makes about 1 1/4 cup or so. Use this syrup as a direct substitute for corn syrup in most recipes.
I recommend making the syrup fresh and using it within a day of making it. The acid in it is supposed to interfere with the formation of sugar crystals, but in my experience the effect doesn’t last long. For me, the syrup remains liquid for several hours, but if I leave it all day or overnight, it becomes crystallized. I don’t know if it’s because of the sugar I use or something else, and I don’t know if other people would have different results. If you notice sugar crystals forming in the bottom of the pot after sitting awhile, try to pour the syrup off, and don’t scrape the pot.
Marshmallow Eggs
- After making the sugar syrup, start by preparing the egg molds. Fill a rimmed cookie sheet with flour and use a small plastic Easter egg to make egg shapes in the flour. I used three cookie sheets with 3 rows of 6 on each one. (If you don’t want to use flour, use powdered sugar instead. I think that’s actually how marshmallows are usually dusted, but for me flour is much less messy, and any traces of flour aren’t noticeable with the chocolate. If you aren’t planning on dipping these in chocolate, however, don’t use flour. It won’t taste very good. Ask me how I know.)
- After preparing the pans, you need to soften the gelatin. Pour the cold water into the mixer bowl of an electric stand mixer and sprinkle the gelatin on top of the water. A stand mixer is really helpful for this recipe because the motor is stronger and can withstand running longer. Also, it is much easier on your arms to just let it run by itself.
- While the gelatin is softening, combine the sugar, prepared sugar syrup, water, and salt in a medium saucepan. Heat over medium-low heat, stirring until the sugar dissolves. When the sugar is dissolved, clip a candy thermometer to the side of the pan and increase the heat to medium. Continue cooking without stirring, letting the mixture boil gently until it reaches 240°F. This should take about 15 minutes.
- Turn the mixer on low and carefully pour the hot syrup in a slow and steady stream into the bowl. When all the syrup has been added, turn the mixer to high and beat for about 9 minutes. (I’ve found that 9 minutes works best for me. At this point it is thick and fluffy and mounds slightly, but it still flows and is soft enough that it levels out in the molds.) Depending on the kind of mixer you have or how thick you’d like the mixture to be, it could take more or less time.

- The mixture will continue to stiffen as it cools, so work quickly to spoon the mixture into the flour molds. I don’t find it necessary to grease the spoons, but it may be helpful for you to do so. If you end up with more marshmallow than molds, you can quickly prepare some more molds in another pan or dish.
- When all the egg molds are filled, cover the eggs with flour, being careful not to touch the marshmallow or mess up the molds. Or you can just spoon more flour on top from the container. Leave the eggs to set for about 2 hours.

Dipping in Chocolate
I recommend dipping the eggs the same day you make them, not leaving them overnight. One time I made some eggs that I left overnight to dip the next day, and they ended up with a grainy texture from crystallization. I can’t say for certain if that was the cause, but just in case I always dip them the same day. It may be related to the kind of sugar I have or the fact that there’s no corn syrup or something else entirely. I’ve always had good results dipping the marshmallows the same day. If you do decide to leave them overnight, it’s possible your results will be different from mine.
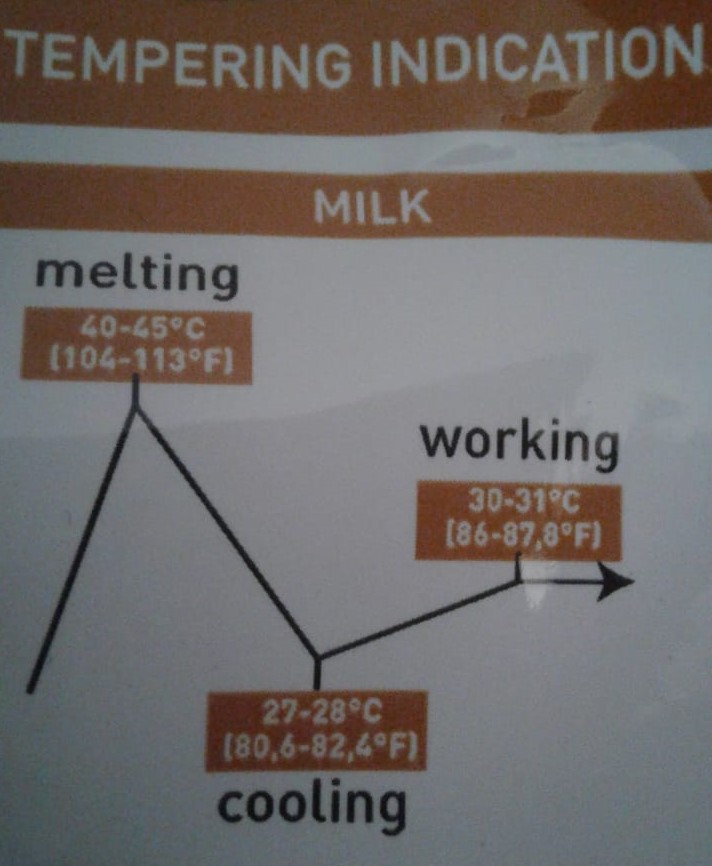
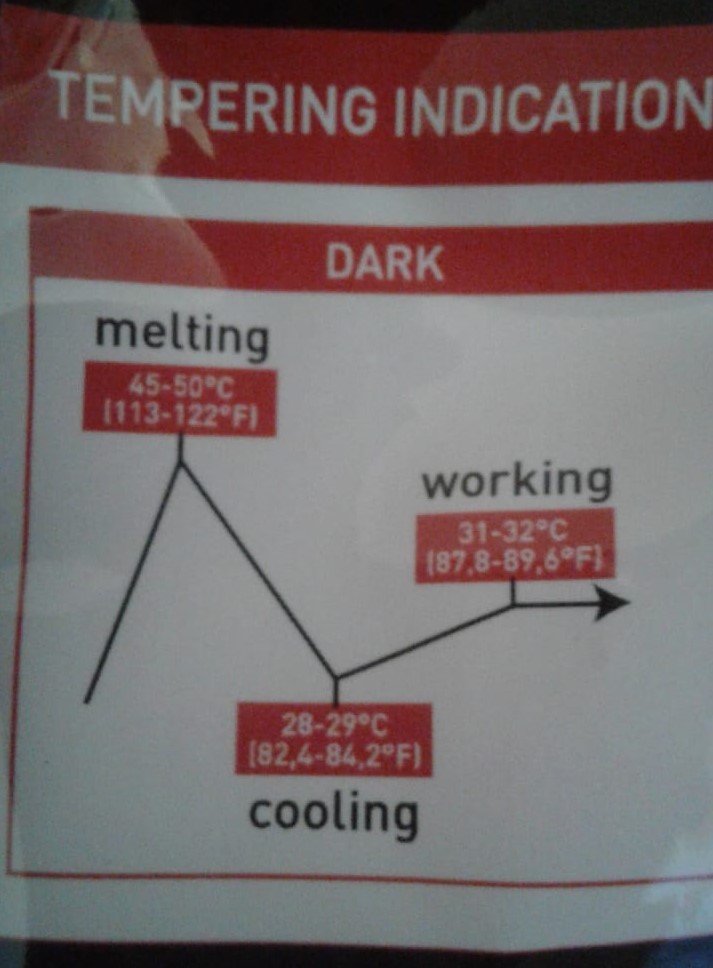
When you dip chocolate, you need to work in a cool room. If it’s too warm, the chocolate won’t set up properly. You can find tempering instructions in many places online. Basically, you need to melt the chocolate, then cool it to a certain temperature, then warm it up to a working temperature. If you get a bag of actual dipping chocolate, it may have those temperatures written on the bag. I use this brand of chocolate that I love, and it’s a very helpful reference to have the temperatures on the bag. I do two batches of chocolate when I make these: one dark and one milk for the people in my family who prefer one or the other.

Tempering Tips
I’m not an expert on tempering chocolate. I have made many, many attempts at dipping and molding chocolate, some which failed for one reason or another and some which turned out really well. I find that the more I do it, the better it turns out. I’m just going to share a few tips that I have learned through both reading and personal experience.
You need to melt the chocolate in a double boiler over low heat. Some people do it in a microwave, but I don’t, so I can’t speak to that. After melting, add in a small amount of unmelted chocolate pieces to start cooling it and to seed it. For dark chocolate, you melt it and then let it cool to around 82°F. Then you slowly warm it to 88°F, which is the working temperature. For milk chocolate, you cool to around 80°F and then warm it to 86°F.
Don’t let the water boil and don’t let the chocolate get too hot. Generally, the temperature shouldn’t exceed 120° for dark and 110° for milk or it could burn. If it should happen to get a bit above, it may still be okay as long as it is still smooth. If it becomes lumpy, it has been overheated. You may still be able to save lumpy chocolate by straining it to remove the lumps.
Use a rubber spatula to gently stir the chocolate throughout the entire process. The rubber spatula will enable you to scrape the sides more cleanly and not lose as much chocolate that way. Tempering is something of a long process and could take a while. It’s important not to rush it, or it may not turn out well.

An easy test to know if the chocolate is ready is to dip a knife into it. If the chocolate is properly tempered, it should lose its shine and start to solidify within a minute or two. If the chocolate cools down too much and starts to get thick while you’re working, return the pot to the hot water to warm up to the working temperature again. Don’t let the temperature reach 90° or the temper could be lost, and you’ll have to start over. Don’t let any water get in the chocolate or it could seize.
Dipping the Marshmallow Eggs
When you are ready to dip the eggs, brush all the flour off them. A tip from my genius sister is to use a pastry brush. It works really well for getting most of the flour off. My two younger sisters help me with this step by “eggscavating” while I tend the chocolate. 🙂

Return all the flour to its container. Now you can cover the pans with waxed paper to put the chocolate-covered eggs on.
My sister got me a set of dipping tools to use for this. If you don’t have a dipping fork, you can just use a regular fork. I used to use a fork, but I’d find that the solidifying chocolate tended to gunk up the tines as I worked. I would use 3 or 4 forks for one dipping session. Now I use this and it’s so much better. Since the tines are thinner and farther apart, they don’t get as much chocolate stuck on them.
Drop an egg into the pot of chocolate. Spoon chocolate over it if necessary to cover it. Use the fork to scoop it out of the chocolate, and tap the fork several times on the side of the pot so any bubbles in the chocolate will come to the surface and pop. Use a knife to gently scrape the bottom side of the fork to remove excess chocolate. Carefully use the knife to slide the egg off the fork onto the waxed paper. Repeat with the remaining eggs. Allow the eggs to sit at cool room temperature until the chocolate hardens completely. If it’s tempered properly, it shouldn’t take too long.

And there you have it! A soft, fluffy marshmallow coated in chocolatey goodness with the satisfying snap of a good temper. Try to resist the urge to eat more than one at one time. Don’t worry if you can’t; neither can I. 🙂

[…] love marshmallows? They’re so soft and squishy and tasty. Ever since making my own marshmallows, I’ve been in love with them, and ever since I starting thinking about designing crochet […]